Spring is a popular Java framework for building web applications. Spring is an umbrella project that contains many sub-projects, one of which is Spring Boot.

Spring Boot has built-in support for GraphQL. It makes it easy to build and test GraphQL APIs, and has the benefit of being part of the Spring ecosystem. Spring Boot provides a set of defaults and conventions to simplify the development of Spring applications, which means that we can use the same tools and libraries that we use for building REST APIs, such as Spring Data to query a database, or we can use Spring Security to secure our API. It is designed to get you up and running as quickly as possible, with minimal upfront configuration.
According to the official GraphQL website:
GraphQL is a query language for APIs and a runtime for fulfilling those queries with your existing data. GraphQL provides a complete and understandable description of the data in your API, gives clients the power to ask for exactly what they need and nothing more, makes it easier to evolve APIs over time, and enables powerful developer tools.
In this tutorial, we will build a Spring Boot application that exposes a GraphQL API. The source code for the application is available on GitHub.
Jump ahead:
- Benefits of using GraphQL
- Creating the Spring Boot app
- Defining the GraphQL schema
- Testing our schema
Benefits of using GraphQL
GraphQL can be used as a replacement for REST APIs. The advantages of GraphQL over REST include:
- More efficient than REST: Because GraphQL allows the client to specify exactly what data it needs, the server can send back only the data that the client needs, instead of sending back a whole object that the client may not need
- This can result in a significant reduction in the amount of data that needs to be transferred over the network, also known as over-fetching
- Type safety: The client can only request fields that are present in the schema, which means the client can’t request fields that don’t exist, and the server can’t send back fields that the client didn’t ask for
- GraphQL is self-documenting: The schema is the single source of truth for the API
If you want to learn more about GraphQL, check out our archives.
Creating the Spring Boot app
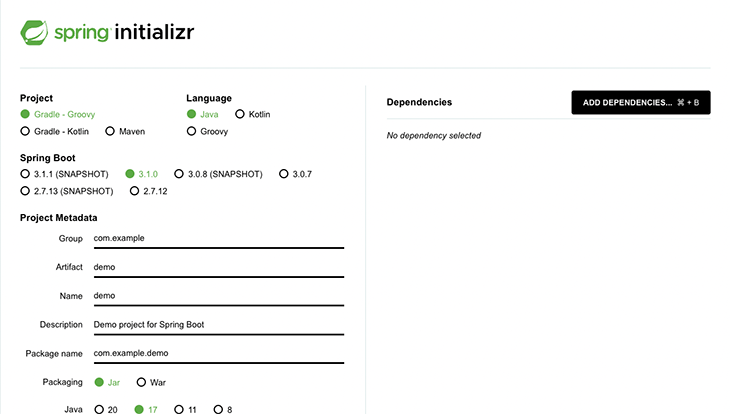
Let’s create a new Spring Boot application using the Spring Initializr. Go to https://start.spring.io/ and click Add Dependencies:

Add the following dependencies:
- Spring Web
- Spring for GraphQL
You can also use this link to generate the project.
Defining the GraphQL schema
The first step is to define the schema for our GraphQL API using the GraphQL Schema Definition Language (SDL). The schema defines the operations that can be performed on the data and the types of data that can be returned by those operations.
GraphQL makes a distinction between types that can be queried (query types) and types that can be mutated (mutation types). This is similar to REST, where GET requests are used to query data and POST, PUT, and DELETE requests are used to mutate data.
In GraphQL, the query type is called query and the mutation type is called mutation.
Let’s create a new schema file called schema.graphqls in the src/main/resources/graphql directory. Our application will have two types: Movie and Actor.
A movie has an ID, a title, a release year, a list of genres, and a director. An actor has an ID, a name, and a list of movies they have acted in. We can define the schema for our GraphQL API as follows:
type Movie {
  id: ID!
  title: String!
  year: Int!
  genres: [String!]!
  director: String!
}

type Actor {
  id: ID!
  name: String!
  movies: [Movie!]!
}
GraphQL supports the following scalar types out of the box:
- ID
- String
- Int
- Float
- Boolean
The ID type is used for unique identifiers, while the ! after the type name indicates that the field is non-nullable.
The schema is not very useful if we can’t query or mutate data. We will get to that later. For now, let’s create some data to work with.
Generating data for our GraphQL schema
GraphQL doesn’t care where data comes from. It can be a database, a cache, or any other data source. To keep things simple, we will keep the data in memory, as arrays.
First, let’s create a Movie record:
public record Movie(int id, String title, int year, List<String> genres, String director) {}
And then an Actor record:
public record Actor(int id, String name, List<Movie> movies) {}
Let’s now mock the MovieRepository and ActorRepository:
@Repository
public class MovieRepository {
    private List<Movie> mockMovies;
    @PostConstruct
    public void initializeMockMovies() {
        mockMovies = new ArrayList<>(List.of(
                new Movie(1L, "The Matrix", 1999, List.of("Action", "Sci-Fi"), "The Wachowskis"),
                new Movie(2L, "The Matrix Reloaded", 2003, List.of("Action", "Sci-Fi"), "The Wachowskis"),
                new Movie(3L, "The Matrix Revolutions", 2003, List.of("Action", "Sci-Fi"), "The Wachowskis")
        )
        );
    }

    public Movie getById(Long id) {
        return mockMovies.stream().filter(movie -> movie.id().equals(id)).findFirst().orElse(null);
    }

    public void addMovie(Movie movie) {
        mockMovies.add(movie);
    }
}

@Repository
public class ActorRepository {

    private List<Actor> mockActors;
    private MovieRepository movieRepository;

    public ActorRepository(MovieRepository movieRepository) {
        this.movieRepository = movieRepository;
    }

    @PostConstruct
    private void initializeMockActors() {
        mockActors = new ArrayList<>(List.of(
                new Actor(1L, "Keanu Reeves", "1964-09-02", List.of(movieRepository.getById(1L), movieRepository.getById(2L), movieRepository.getById(3L))),
                new Actor(2L, "Laurence Fishburne", "1961-07-30", List.of(movieRepository.getById(1L), movieRepository.getById(2L), movieRepository.getById(3L)))
        )
        );
    }

    public Actor getById(Long id) {
        return mockActors
                .stream()
                .filter(actor -> actor.id().equals(id))
                .findFirst()
                .orElse(null);
    }
}
Instead of using a database, we are using the @PostConstruct annotation to initialize the mock data. After dependency injection finishes, we use the @PostConstruct annotation on a method to perform any remaining initialization. We executed this method after we call the constructor.
We also defined a getById method in both repositories, which we’ll use to query the data.
With the data layer in place, we can now focus on the GraphQL layer.
Writing queries and mutations
We will now define the queries and mutations that will be exposed by our GraphQL API. Queries fetch data; mutations modify data.
Let’s go back to the schema.graphqls file and add the following queries and mutations:
type Query {
  movieById(id: ID!): Movie
  actorById(id: ID!): Actor
}

type Mutation {
  addMovie(
    id: ID!
    title: String!
    year: Int!
    genres: [String]!
    director: String!
  ): Movie
}
The movieById query takes an ID argument and returns a Movie. The actorById query takes an ID argument and returns an Actor.
The addMovie mutation takes ID, title, year, genre(s), and director as arguments and returns a Movie.
We need to create two controllers to expose these operations, MovieController and ActorController:
@Controller
public class MovieController {
    private final MovieRepository movieRepository;
    public MovieController(MovieRepository movieRepository) {
        this.movieRepository = movieRepository;
    }

    @QueryMapping
    public Movie movieById(@Argument Long id) {
        return movieRepository.getById(id);
    }

    @MutationMapping
    public Movie addMovie(@Argument Long id, @Argument String title, @Argument Integer year, @Argument List<String> genres,
                          @Argument String director) {

        Movie movie = new Movie(id, title, year, genres, director);
        movieRepository.addMovie(movie);
        return movie;
    }
}
@Controller
public class ActorController {

    private final ActorRepository actorRepository;

    public ActorController(ActorRepository actorRepository) {
        this.actorRepository = actorRepository;
    }

    @QueryMapping
    public Actor actorById(@Argument Long id) {
        return actorRepository.getById(id);
    }
}
We use @QueryMapping and @MutationMapping to map the queries and mutations to their respective methods. The @Argument annotation is used to bind the method argument to the GraphQL query or mutation argument.
There are a lot of moving parts in this example. Let’s take a moment to recap what we have done so far:
- We created a GraphQL schema that defines the data model and the queries and mutations that will be exposed by our API
- We defined
ActorandMovieentities - Instead of using a database, we mocked the data in memory
ActorControllerandMovieControllerexpose the queries and mutations defined in the schema.
It’s worth noting that the name of the method matches the name of the query or mutation. This is not a requirement — instead, we could have named the methods differently and passed the name of the query or mutation as an argument to the @QueryMapping and @MutationMapping annotations. The following example shows how to use the @QueryMapping annotation with a custom method name:
/*
Mapping the method to a query by setting the name attribute of the @QueryMapping annotation
*/

@QueryMapping(name = "actorById")
public Actor findActorById(@Argument Long id) {
   return actorRepository.getById(id);
}
This is equivalent to the previous example, so we can use either approach.
Testing our schema
GraphQL has a built-in playground that we can use to test the API. Enable it by adding the following property to the application.properties file:
spring.graphql.graphiql.enabled=true
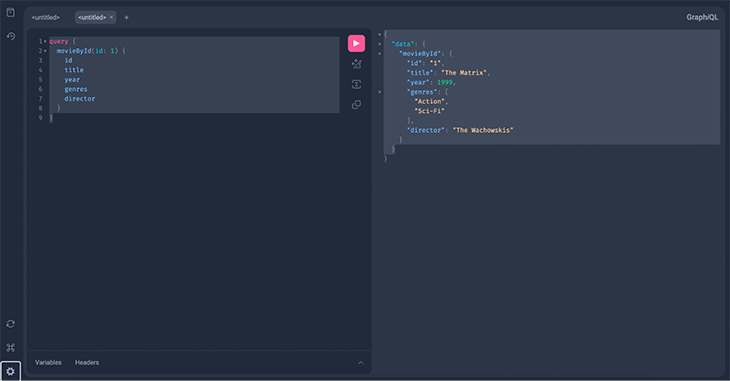
Now, let’s start the application and navigate to http://localhost:8080/graphiql. We should see the GraphQL playground.
A simple query to fetch a movie by its ID would look like this:
query {
  movieById(id: 1) {
    id
    title
    year
    genres
    director
  }
}
We should see something like this:

Let’s also try a mutation to add a new movie:
mutation {
  addMovie(
    id: 4
    title: "Inception"
    year: 2010
    genres: ["Action", "SciFi"]
    director: "Christopher Nolan"
  ) {
    id
    title
    year
    genres
    director
  }
}
In case a client doesn’t need all the fields of a movie, it can select only a subset. For example, if we only need the title and the year of a movie, we can modify the query to look like this:
query {
  movieById(id: 4) {
    title
    year
  }
}
Performing automated tests on our schema
Testing the API using the GraphQL playground is great for development, but it’s not suitable for automated testing. We need to write tests to verify that the queries and mutations work as expected.
Let’s add a test class for the ActorController:
@SpringBootTest
class SpringGraphqlDemoApplicationTests {

    @Autowired
    private ActorController actorController;

    @Test
    void queryActorById() {
        Actor actor = actorController.actorById(1L);
        assert actor.name().equals("Keanu Reeves");
    }
}
As you can see, we use the @SpringBootTest annotation to load the application context. We can then use the @Autowired annotation to inject the ActorController bean. Finally, call the actorById method to verify that the returned actor has the expected name.
Conclusion
In this article, we learned how to build a GraphQL API using Spring Boot. We created a GraphQL schema that defines the data model and the queries and mutations that will be exposed by our API. We defined Actor and Movie entities and mocked the data in memory. We also created ActorController and MovieController to expose the queries and mutations defined in the schema. Finally, we wrote a test class to verify that the queries and mutations work as expected.
The full code in this post can be found on my GitHub.
The post How to use GraphQL in a Spring Boot app appeared first on LogRocket Blog.